

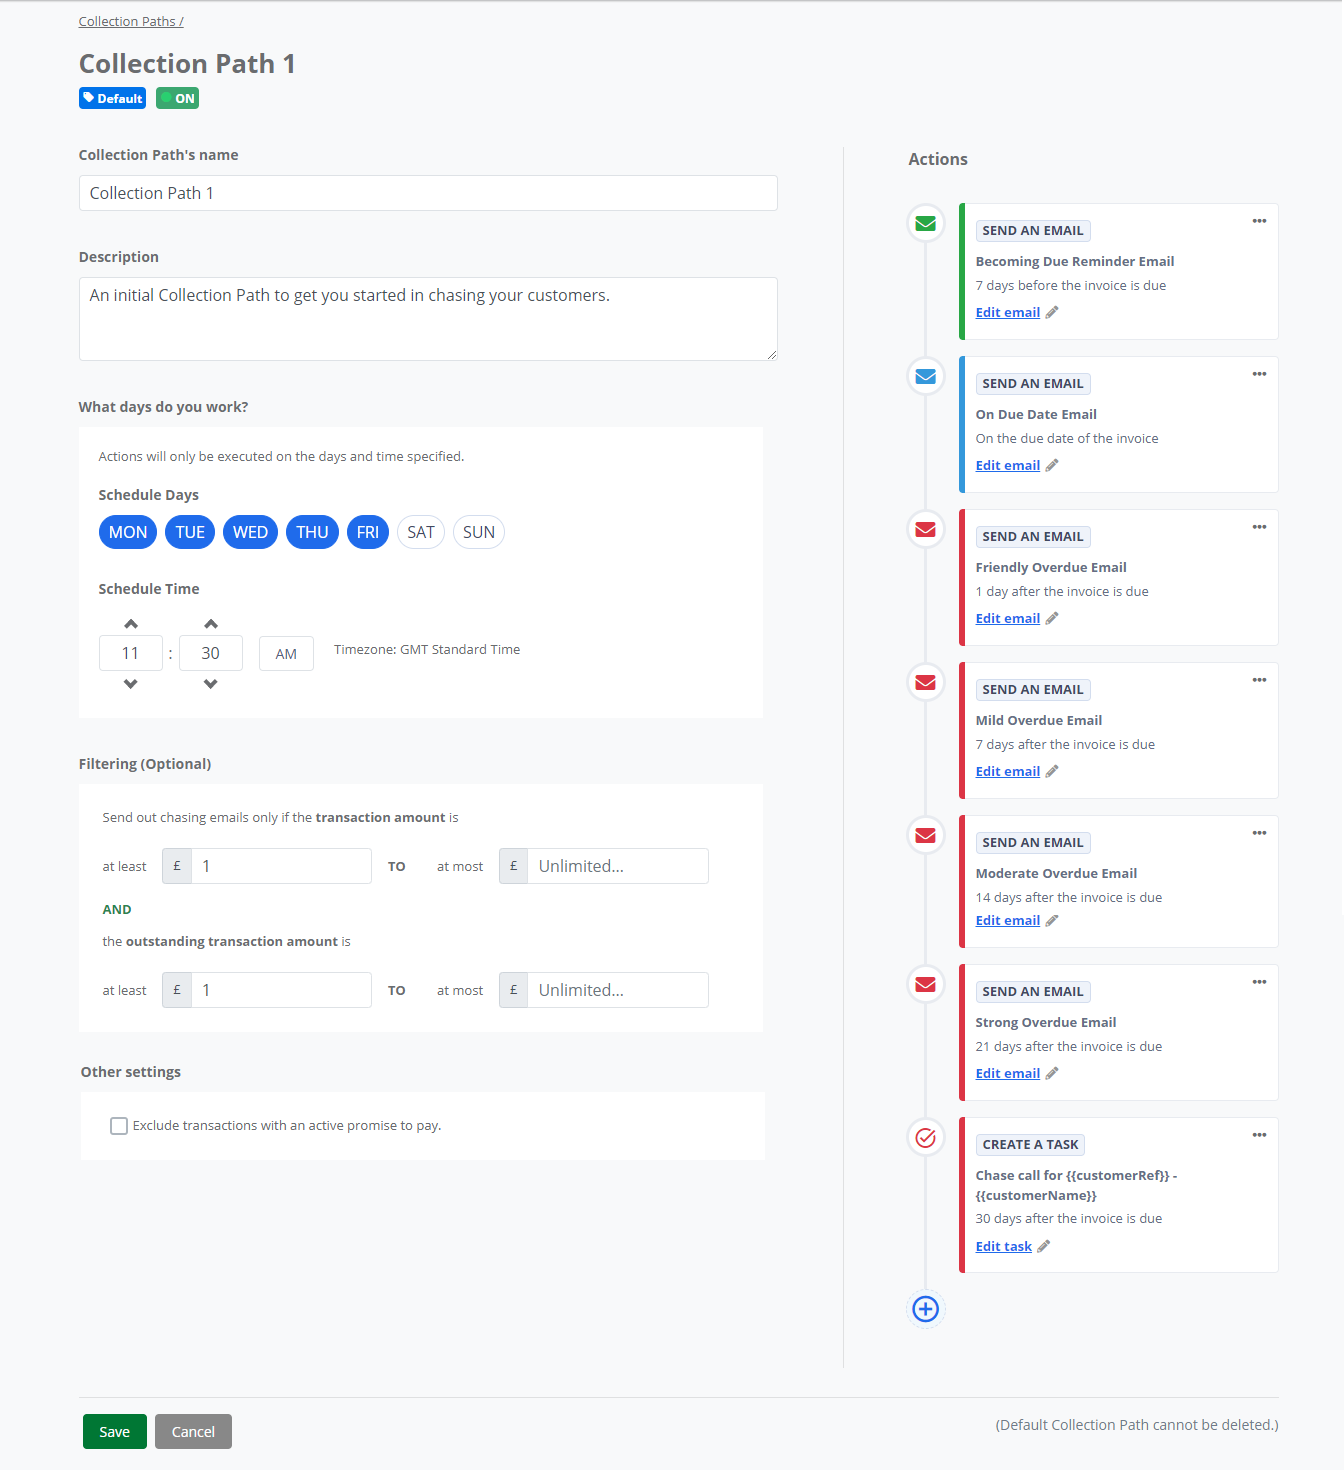
The configuration screen for the Collection Path allows you to setup the sequence of steps to automatically chase your customers outstanding invoices, with the ability to tailor the tone and content of the emails for each step by editing the pre-defined email templates. You can also schedule when you would like the Collection Path to send the automated emails or create a task for you to call a customer.
Enabling and disabling a Collection Path
On the Collection Paths list page, the switch control in the ENABLED column to the right of the Collection Path's Name allows you to turn this collection path on or off.
Turning on a Collection Path starts the automatic chasing process. Credit Hound will assign the steps you have defined to transactions that match the criteria you have set in this collection path.
Turning off a Collection Path stops automatic chasing for that path. The following notification bar may appear if all of your Collection Paths are turned off:

You can clear the notification by clicking on the X symbol in the corner.
Options
| Name | The name you assign this collection path. This is displayed in the collection path list, and beside the transactions it is assigned to. |
| Description | Your own friendly description of this collection path. |
Chasing Mode
When creating or editing a Collection Path you can choose how the path evaluates your customers’ invoices:
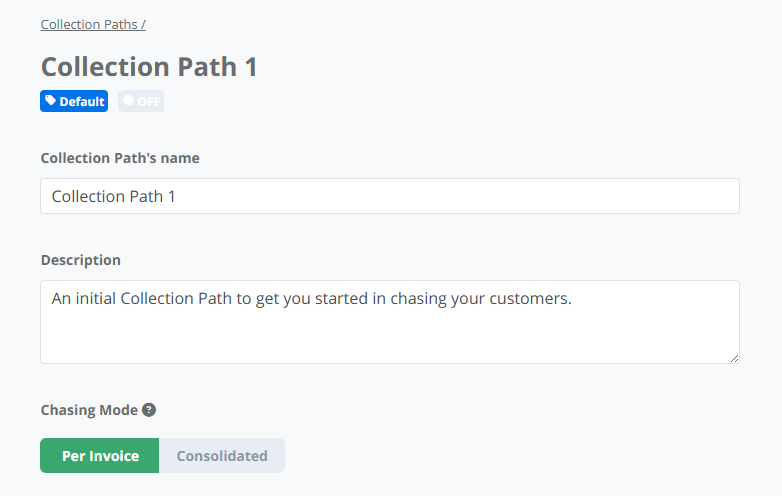 Chasing Modes
 - Per Invoice - Emails and tasks are scheduled based on each individual invoice’s due date.
- Consolidated - In Consolidated mode, each step defines an overdue range. Invoices that fall within that range are grouped together and included in a single communication for that step.
Depending on the selected mode, some configuration options will behave differently. For example:
- In Per Invoice mode, send email and task steps are configured with fixed days before/after due date.
- In Consolidated mode, email steps use overdue ranges, and tasks use a definitive due day.
For more information about these two modes and when to use them, see Chasing Modes: Per Invoice and Consolidated.
Scheduling
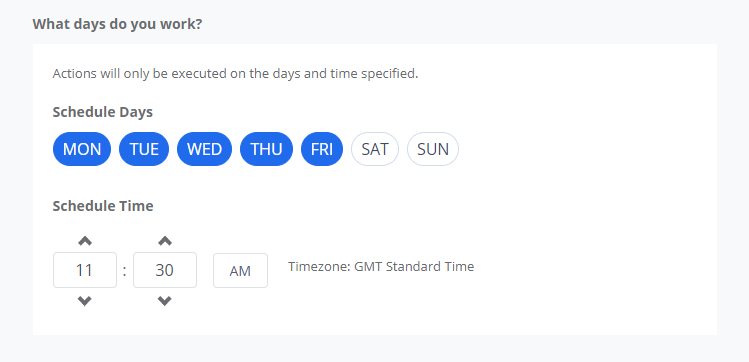
Schedule Days
Select the days of the week you work. This allows you to specify when you want the Collection Path to run for your automated chase emails to be sent out to your customers or for your tasks to be due. The system can be setup to take into account a five-day working week, so you can exclude weekends. This allows you to manage your working processes and additionally your customers will receive their emails at the most effective time for their business.
If an automated email or a task was scheduled for a day that has been excluded, it will be sent or due on the next eligible day based on the selected days.
Schedule Time
This is the time that the emails will be automatically sent out on the scheduled days. It is recommended that this time should be set during your normal working hours.
Filtering
You can set the minimum and maximum transaction amount and outstanding transaction amounts here. Any invoice falling outside of these ranges will be not be assigned to this collection path. All values are in base currency.
Send out chasing emails only if the transaction amount is
| At least | The invoice should be at least this amount to be assigned to this collection path. |
| To at most | The invoice should be less than or equal to this amount to be assigned to this collection path. If you do not require a maximum amount, you can leave this value blank. This means any invoice over the minimum transaction amount will be assigned to this collection path. |
Send out chasing emails only if the outstanding transaction amount is
| At least | The invoice's outstanding amount should be at least this amount to be assigned to this collection path. |
| To at most | The invoice's outstanding amount should be less than or equal to this amount to be assigned to this collection path. If you do not require a maximum amount, you can leave this value blank. This means any invoice over the minimum outstanding transaction amount will be assigned to this collection path. |
The filters are evaluated together, which means you can set a transaction amount threshold combined with an outstanding transaction amount threshold. If you do not require a minimum or maximum amount, you can leave one or both of the fields empty.
Exclude transactions with an active promise to pay
The 'Exclude transactions with an active promise to pay' option prevents transactions with an Open promise from being automatically chased in the Collection Path. This stops automatic payment reminders for invoices marked with a Promise to Pay, ensuring that customers who have already committed to paying are not sent reminders.

When enabled:
- Transactions with an Open promise are excluded from automated chasing.
- If the promise is Broken (not paid by the promise due date), the invoice re-enters the Collection Path.
- If an invoice has multiple promises, it remains excluded until all promises are either Kept or Broken.
| Scenario | Outcome |
| Invoice has an Open Promise to Pay | Not chased (excluded from Collection Paths). |
| Promise is Broken (payment is not made by the promise date) | Automated chasing resumes automatically. |
| Promise is Kept, and the invoice is fully paid | Not chased as there is no outstanding amount on the invoice (excluded from Collection Path). |
| Promise is Kept, but the invoice has an outstanding amount | Automated chasing continues chasing for the remaining amount. |
| Promise is Cancelled | Automated chasing resumes automatically. |
| Invoice(s) never had a promise | Included in Collection Path automated chasing. |
Notes:
- This setting only applies to automated chasing. Manual chasing is not affected.
- Partially paid invoices with a Kept promise will be chased for the remaining balance.
- If a promise is manually cancelled, the invoice is included in automated chasing again.
- If an invoice has multiple promises, it will only re-enter chasing when there is no active promise left.
For more information on promised payments, see Promises.
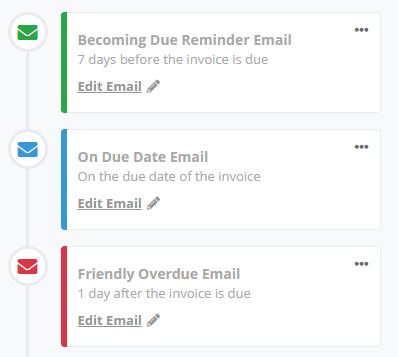
Collection Sequence
A collection sequence is a series of actions that take place over a period of time, based from the date an invoice is due.
Adding a Send Email Action Step
- Click on the + icon at the bottom of the sequence.

- Select Send an email. The Add an Action: Send Email to Customer dialog box appears.
The configuration options displayed will depend on the selected Collection Path Mode:
Per Invoice Mode
In Per Invoice mode, email steps are scheduled using a single day offset relative to the invoice due date.
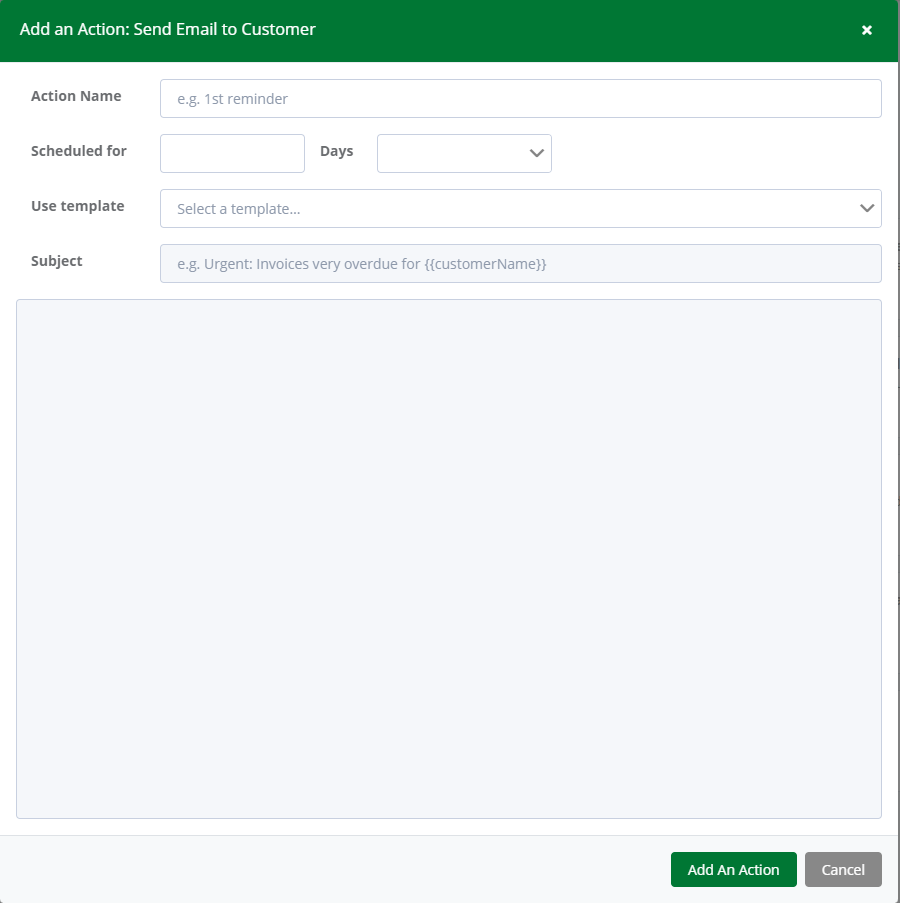
- In the Action Name field, enter a brief description of this action. E.g. Friendly Reminder Email
- In Scheduled for enter the number of days before or after the due date you want the invoice to be sent. Numbers should be positive.
- Select when you want the email to be sent from the drop down. All dates are based from the invoice due date.
| Before Due Date | Sends the email 'n' number of days before the invoice is due. Choose the number of days in the No. Days field. |
| On Due Date | This will send the email on the date the invoice is due. The No. Days field will become disabled since it has no meaning for this option. |
| After Due Date | Sends the email 'n' number of days after the invoice is due. Choose the number of days in the No. Days field. |
Consolidated Mode
In Consolidated mode, email steps are defined using overdue ranges.
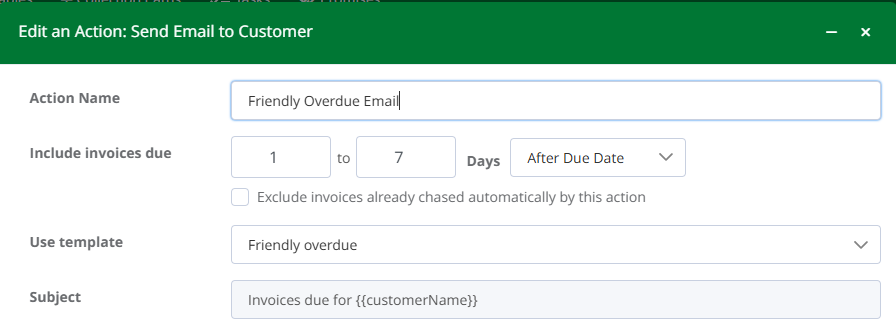
Include Invoices Due
Specify a range of days (for example, 1 to 7 Days After Due Date).
You can choose whether the range applies:
- Before Due Date
- On Due Date
- After Due Date
When invoices fall within this defined range, the step may be triggered.
Exclude Invoices Already Chased Automatically by This Action
When selected, invoices that have already triggered this step will not trigger it again if they remain within the same range.
This is useful when using broader overdue bands.
- From Use template, select the predefined email template to use. The Subject and body will show the email content from the email template you have configured. See the Managing Email Templatesarticle for more details.
- If you do not want to use a predefined template and want to customise the email, select Don't use template. You can then then add and edit the email content in the email editor.
- If you are not using an email template, you will have to provide an Email subject to be used when sending the email to your customer. You can use Custom Fields within the subject e.g. {{customerName}} for the Customer Name.
- Click the Add An Action button.
Adding a Create a Task Action Step
- Click on the + icon at the bottom of the sequence.
- Select Create a task. The Add an Action: Create a Task dialog box appears.

- In the Task Title field, enter a brief description of this action. You can use custom fields to customize your task title E.g. Chase call for {{customerRef}} - {{customerName}}. See this FAQ for for further information.
- In Create Task enter the number of days before or after the transaction due date you want the task to be due. Numbers should be positive.
- Select when you want the task to be due from the drop down. All dates are based from the invoice due date.
Before Due Date Creates the task 'n' number of days before the invoice is due. Choose the number of days in the No. Days field. On Due Date This will creates the task on the date the invoice is due. The No. Days field will become disabled since it has no meaning for this option. After Due Date Creates the task 'n' number of days after the invoice is due. Choose the number of days in the No. Days field. - For Task Visibility, the task will appear in your To Do list, on it's task day column, up to the specified number of days in advance (defaulted to 7 days). This allows you to have early visibility of the task and to plan your working week. Note: The maximum value for this setting is 90 days.
- From Assign To, you can set the user who you want the task to be assigned to.
- Under Details (Optional): enter any notes or details about your task. You can use custom fields in the details also. See this FAQ for for further information.
- Auto-complete this task: Enabling this option means the task will be automatically completed when all related transactions are fully allocated. This is enabled by default. See the Auto-complete Tasks article for further details.
- Click the Add An Action button.
Task Behaviour in Different Collection Modes
Tasks are configured using a definitive number of days before, on, or after the invoice due date. The configuration steps are the same in both Collection Path modes.
However, task behaviour differs slightly depending on the selected mode:
Per Invoice Mode
Each invoice can generate its own task when it reaches the configured day.
Consolidated Mode
Tasks continue to operate using a definitive overdue day and are not range-based.
Tasks operate independently from email steps and are not governed by the cooling-off period. When an invoice reaches the configured overdue day, the task will be generated according to the Collection Path schedule.
This allows you to combine structured, range-based email communication with precise follow-up activities triggered on specific overdue days.
Note: If the time gap between this Collection Path action and the previous action is shorter than the specified number of days in the 'Task Visibility' setting, the task may become visible earlier under the task's due day.
Removing an Action Step
- Click on the ellipsis (...) in the top-right corner of the action you want to remove.
- When the remove confirmation dialog appears click Remove.
- The action has been remove from the sequence.